In this post, we are going to take a look at Redline Stealer, a well-known .NET based credential stealer. I will focus on unpacking the managed payload and extracting it’s config, for a more detailed analysis of the payload you can check out this post by c3rb3ru5d3d53c.
Dealing with the native dropper
Many of the in-the-wild samples of Redline are plain .NET applications with pretty basic custom obfuscation. Considering that many commonly used obfuscators lead to false positive AV detections this is very likely intentional. Although primarily using .NET, many samples come packed in a native x86 wrapper that will load the managed payload at runtime. Unpacking this native dropper is quite simple, it uses process hollowing on a legitimate process. We can use this to our advantage; since the injection requires the process to be started in suspended mode we can simply use a debugger to pause the execution before the process is unsuspended and dump it. The injection target might vary between versions. In my case, they inject into AppLaunch.exe which is a utility binary of .NET Framework 4.0+, that is part of the standard Windows 10 install.

The dropper dynamically resolves the functions required for process hollowing. So we will not find them in the imports but there are some artifacts from gcc’s error handling which give a hint as to which functions are used. Strings like “VirtualProtect failed…” make it easy to guess what is going on even if the actual functions are dynamically resolved. The following functions are used:
1
2
3
4
5
6
7
CreateProcessW
ReadProcessMemory
VirtualProtect
NtWriteVirtualMemory
NtSetContextThread
NtResumeThread
NtUnmapViewOfSection
It then performs simple process hollowing. Which we can simply dump. For this, I use x32Dbg, and set a breakpoint on NtResumeThread then continue execuction. Once the breakpoint hits I dump the AppLaunch.exe process, that was spawned by the dropper, using ExtremeDumper to get a perfectly working managed image from the process. Make sure to run ExtremeDumper as Admin to find the AppLaunch process. Once we have the dumped image we can simply terminate AppLaunch.exe and our debuggee.
Dealing with the managed part
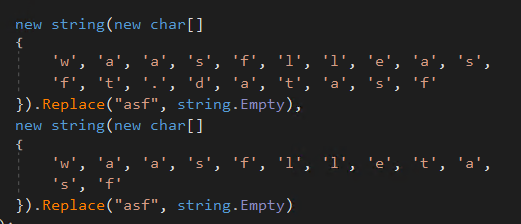
Most of Redline’s obfuscation is focused on the strings. Not all strings are obfuscated but most of the characteristic ones are, especially strings that can be used to detect the malware. These obfuscated strings are constructed at runtime from a char array and in some cases, they have random text inserted that will be removed from the string before it’s used.

Since this was quite annoying to get rid of manually for the whole binary I decided to write a custom tool. The tool is pretty simple, it consists of two clean-up stages. The first one is to remove the array to string assignments And the second one is to clean the inserted text and replace operations. I also added a stage for config extraction which will be discussed later. As per usual I came up with a fun name for this tool: It’s called Greenline.
Deobfuscating the strings
We begin by searching for all string constructors that take a char array as it’s parameter and are preceded by a call instruction. The constructor is called using a newobj instruction, with the constructor as it’s operand. The constructor requires a char array to be pushed on the stack before its executed. Lets look at what the code we are dealing with looks in CIL:
IL_0000: nop
IL_0001: ldc.i4.5
IL_0002: newarr System.Char
IL_0007: dup
IL_0008: ldtoken <PrivateImplementationDetails>::DC0F42A41F058686A364AF5B6BD49175C5B2CF3C4D5AE95417448BE3517B4008
IL_000d: call System.Runtime.CompilerServices.RuntimeHelpers::InitializeArray(System.Array, System.RuntimeFieldHandle)
IL_0012: newobj System.String::.ctor(char[])
The first thing that happens is the array initialization. At IL_0001 the size of the array is pushed on to the stack as an integer, next a new array of type char is initialized. For the next part I need to explain how arrays in .NET are actually stored.
For value type arrays like char, byte etc. that are initialized inline and have more then three elements the compiler will generate a 
In this snippet we can see that the string constructor call is preceded by a call to InitializeArray. This call depends on a couple more instructions. First an array object, which is made up of the instructions from 0020 to 0022 the size of the array which is 19 then the type of the array object char. The dup copies the top most stack item which is the array object and pushes it on top of the stack again, which is later used by the string constructor. Next ldtoken pushes the handle to the field in <PrivateImplementationDetails> onto the stack. So now we have everything our call depends on. Echo can find these kind of dependeny relations automatically, using a symbolic flow graph to obtain all instructions that are required by a consumer like the call in the example.
Using the obtained dependencies we can manually construct the string and patch the old CIL with just a string assignment, replacing all no longer needed instructions with NOP’s.
The second stage follows the same logic, but this time we search for all calls to the Replace method using two string literals as arguments. We use Echo to obtain the dependencies and patch all no longer needed instructions with NOP’s leaving us with the final deobfuscated string.
Extracting the config
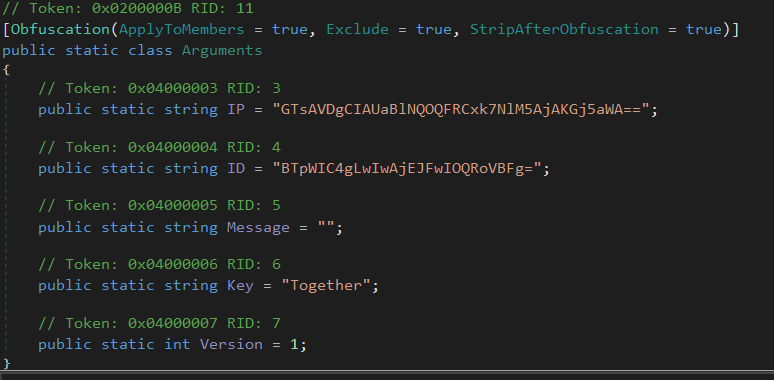
This part is probably the most interesting for the more threat intel focussed readers :D. Identifying the config of Redline is pretty simple when we have easy access to the managed types and their members. I use an exclusion-based search, iterating through the types we abort processing for all types that don’t match our criteria. A few identifiers that I use to find the correct class:

- Is a public static class
- Has a static constructor and 5 fields (the constructor is hidden in the C# view, it initializes the fields with the values seen in the decompilation)
- Has the custom attribute
System.Reflection.ObfuscationAttribute - (Has a field named IP)
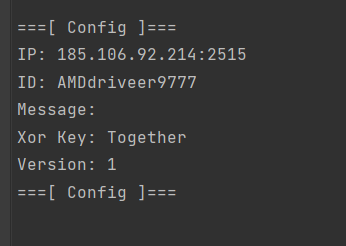
After we find the correct class we obtain all field values by parsing the static constructor of the class, which initializes the fields. The C2 IP and the ID are XOR encrypted and Base64 encoded so we need to decrypt and decode them for that, I simply copied and simplified the decryption routine from Redline. After we decrypted the encrypted fields we have a fully readable config.

Conclusion
I hope you found this little post helpful and can put it to use analyzing Redline Stealer. The tool described in this post and it’s source code are available on my GitHub, feel free to check it out. If you’re interested in .NET deobfuscation in general make sure to check out the code as it’s basic approach can be adapted for other obfuscation of this kind as well.
Samples
- x86 compiled binary: modest-menu.exe, SHA256:0d753431639b3d2b8ecb5fb1684018b2c216fec10cc43d0609123f6f48aa98b8
- Unpacked child => .NET binary: Bahut.exe SHA256: 98d146faabd764f5ddd4a2088dfaf075dd382358026498344c91dcb46a7dff66
- .NET binary: file, SHA256:714AE901F55DB2580AC4AC9048C09EFDCD562F301640A6FD8343293F1EBB36FF
- .NET binary: PEInjection.exe, SHA256:465FBA168502ED66E373DB521F1C0DD93CE30E69D271528051390817977B4818